Now that we have enabled NTP authentication on our own stratum 1 NTP servers (Linux/Raspbian and Meinberg LANTIME) we need to set up this SHA-1 based authentication on our clients. Here we go for a standard Linux ntp setup:
Operating NTP in a secure manner requires the usage of NTP authentication, refer to my Why should I run own NTP Servers? blogpost. Using the Meinberg LANTIME NTP appliance with NTP authentication is quite simply since it requires just a few clicks. Even adding more and more keys (which requires manual work on any other Linux ntp installation) is done within clicks. That’s the way it should be.
As already pointed out in my NTP intro blogpost Why should I run own NTP Servers? it is crucial to leverage NTP authentication to have the highest trustworthiness of your time distribution all over your network. Hence the first step is to enable NTP authentication on your own stratum 1 NTP servers, in my case two Raspberry Pis with DCF77/GPS reference clocks.
Yet another routing protocol I played with in my lab. ;) This time: EIGRP, Enhanced Interior Gateway Routing Protocol, the proprietary distance-vector routing protocol developed by Cisco, which is now public available (RFC 7868). However, no third-party products in here but only Cisco routers. I am using named EIGRP for both Internet Protocols, IPv6 and legacy IP, along with MD5 authentication and redistribution from OSPF.
Here comes a small lab consisting of three Cisco routers in which I used OSPFv3 for IPv6 with IPsec authentication. I am listing the configuration commands and some show commands. Furthermore, I am publishing a pcapng file so that you can have a look at it with Wireshark by yourself.
I already had an OSPFv2 for IPv4 lab on my blog. However, I missed capturing a pcap file in order to publish it. So, here it is. Feel free to have a look at another small lab with three Cisco routers and OSPFv2. Just another pcapng file to practise some protocol and Wireshark skills.
While playing around in my lab learning BGP I configured iBGP with Multiprotocol Extensions (exchanging routing information for IPv6 and legacy IP) between two Cisco routers, a Palo Alto Networks firewall, and a Fortinet FortiGate firewall. Following are all configuration steps from their GUI (Palo) as well as their CLIs (Cisco, Fortinet). It’s just a “basic” lab because I did not configure any possible parameter such as local preference or MED but left almost all to its defaults, except neighboring from loopbacks, password authentication and next-hop-self.
Continue reading Basic MP-BGP Lab: Cisco Router, Palo Alto, Fortinet
It is widely believed that public/private keys or certificates are “more secure” than passwords. E.g., an SSH login via key rather than using a password. Or a site-to-site VPN with certificate authentication rather than a pre-shared key (PSK). However, even certificates and private keys are not unlimited secure. They can be compromised, too, since the public-key cryptography only implies that private keys won’t be exposed if a brute-force attack is nearly impossible.
So, what’s the real security level of passwords compared to public keys/certificates?
If you are using a Lastline device (Manager, Engine, Sensor or Pinbox) you can reach the machine via SSH after you activated it via monitoring_user_password . However, per default this uses only a password for authentication. If you want to use the key-based authentication for this “monitoring” user account you can add the public key to the authorized_keys file for that user.
This is a small record on how to add a public key to the Lastline device. However, it is quite general since the Lastline appliance is built upon a standard Ubuntu server.
Continue reading Lastline SSH Key-Based Authentication for “monitoring” User
This is really cool. After DNSSEC is used to sign a complete zone, SSH connections can be authenticated via checking the SSH fingerprint against the SSHFP resource record on the DNS server. With this way, administrators will never get the well-known “The authenticity of host ‘xyz’ can’t be established.” message again. Here we go:
Continue reading SSHFP: Authenticate SSH Fingerprints via DNSSEC
DNS-based Authentication of Named Entities (DANE) is a great feature that uses the advantages of a DNSSEC signed zone in order to tell the client which TLS certificate he has to expect when connecting to a secure destination over HTTPS or SMTPS. Via a secure channel (DNSSEC) the client can request the public key of the server. This means, that a Man-in-the-Middle attack (MITM) with a spoofed certificate would be exposed directly, i.e., is not possible anymore. Furthermore, the trust to certificate authorities (CAs) is not needed anymore.
In this blog post, I will show how to use DANE and its DNS records within an authoritative DNS server to provide enhanced security features for the public.
Two-factor authentication is quite common these days. That’s good. Many service providers offer a second authentication before entering their systems. Beside hardware tokens or code generator apps, the traditional SMS on a mobile phone can be used for the second factor.
The FortiGate firewalls from Fortinet have the SMS option built-in. No feature license is required for that. Great. The only thing needed is an email-to-SMS provider for sending the text messages. The configuration process on the FortiGate is quite simple, however, both the GUI as well as the CLI are needed for that job. (Oh Fortinet, why aren’t you improving your GUI?)
Here is a step-by-step configuration tutorial for the two-factor authentication via SMS from a FortiGate firewall. My test case was the web-based SSL VPN portal.
Pre-shared keys (PSK) are the most common authentication method for site-to-site IPsec VPN tunnels. So what’s to say about the security of PSKs? What is its role for the network security? How complex should PSKs be? Should they be stored additionally? What happens if an attacker catches my PSKs?
I am listing my best practice steps for generating PSKs.
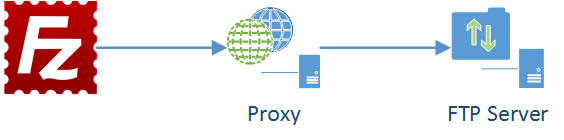
Short memo: This is the FTP proxy authentication format of “Check Point” for the FileZilla FTP Client. I needed it for my Cisco WSA (Web Security Appliance) laboratory in the case of an enabled proxy authentication.
|
1 2 |
USER %u@%s@%h PASS %p@%w |
Continue reading FTP Proxy Authentication Format “Check Point”