
This post is about adding an own (trusted) X.509 certificate for the HTTPS GUI of the Cisco Application Policy Infrastructure Controller aka APIC. You can do this via the GUI itself or via the API. Here are both ways:
A few preliminary comments: Yes, it is not a MUST to have a valid certificate on your APIC in order to access it. But it is definitely a best practice to do so! You can either use your own PKI within your enterprise or you’re using a public trusted CA for this. For this guide, I’m using our own PKI. The process of generating the server certificate and signing it by the intermediate certificate is not part of this post though. In any case, you need the intermediate & root certificate as well as the server certificate and its private key. Everything should be in the PEM format, that is: base64 encoded DES format, with an unencrypted private key. I am using APIC Version 5.2(2f) for the post.

Via GUI
Adding a trusted certificate involves the following steps: 1) Adding the root AND intermediate certificate, 2) importing the actual server certificate incl. its private key, and 3) activating this server certificate. (Refer to Cisco APIC Security Configuration Guide, Chapter: HTTPS Access.)
You have to concatenate the intermediate + root certificate (in that order!) to upload it as a certificate authority. Navigate to: Admin -> AAA -> Security -> Public Key Management -> Certificate Authorities -> Create Certificate Authority. Give it a speaking name and paste the mentioned certificate chain into it.
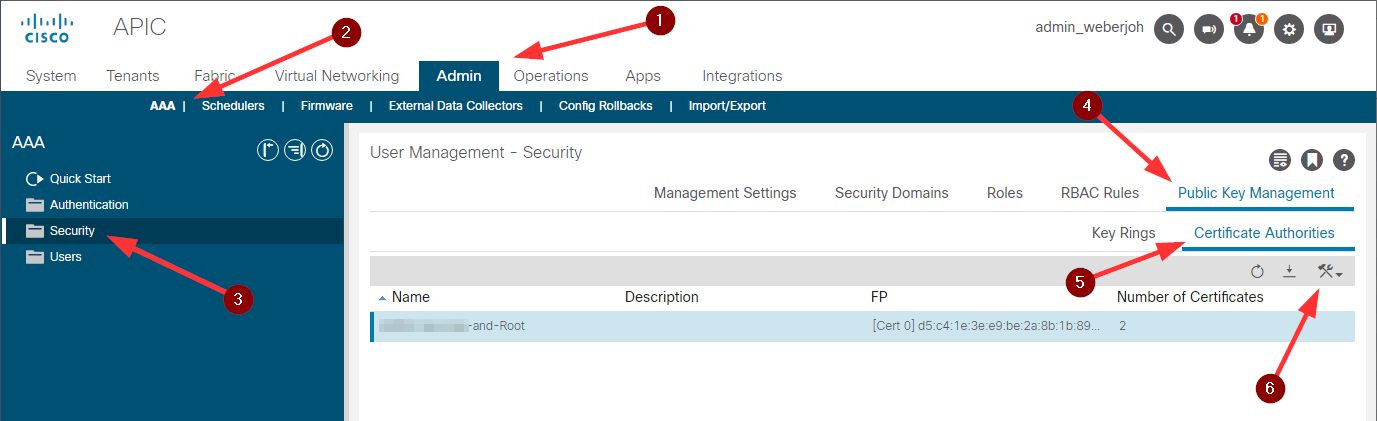
To add the server certificate, go to “Key Rings” and “Create Key Ring”. Give it a name, select the certificate authority you just added, and paste the certificate as well as the private key.

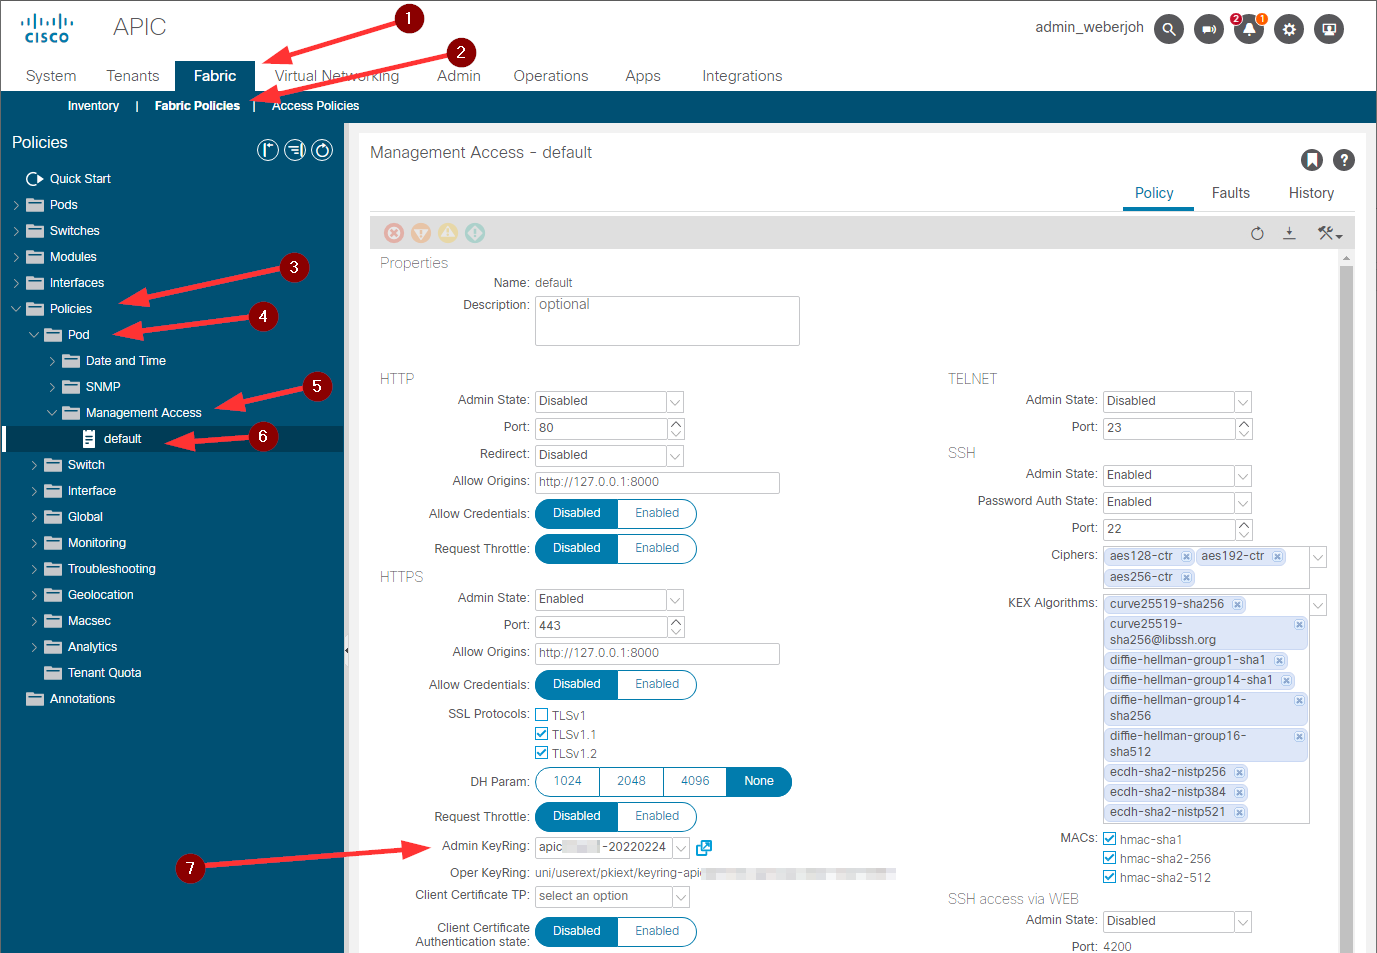
To activate the certificate, navigate to Fabric -> Fabric Policies -> Policies -> Pod -> Management Access -> default and select the just added “Admin KeyRing”.

Via API
In case you are automating everything or at least a bit, you can use the API to get those certs into the APIC. It’s always a POST into the following URL, as seen by Postman in my samples:

The adding involves the same three steps as mentioned before:
10 Install Intermediate +Root CA:
|
1 2 3 4 5 6 7 8 9 10 11 12 13 |
<?xml version="1.0" encoding="UTF-8"?> <imdata totalCount="1"> <pkiTP annotation="" certChain="-----BEGIN CERTIFICATE----- [this is the intermediate cert] -----END CERTIFICATE----- -----BEGIN CERTIFICATE----- [this is the root cert] -----END CERTIFICATE-----" descr="" dn="uni/userext/pkiext/tp-Own-PKI-Inter-and-Root" name="Own-PKI-Inter-and-Root" nameAlias="" ownerKey="" ownerTag=""/> </imdata> |
20 Install Device Cert + Private Key. Note the reference to the trust point (intermediate + root CA) with the tp=”…” parameter:
|
1 2 3 4 5 6 7 |
<?xml version="1.0" encoding="UTF-8"?><imdata totalCount="1"> <pkiKeyRing adminState="completed" annotation="" cert="-----BEGIN CERTIFICATE----- [omitted] -----END CERTIFICATE-----" key="-----BEGIN PRIVATE KEY----- [omitted as well :)] -----END PRIVATE KEY-----" descr="" dn="uni/userext/pkiext/keyring-server-cert-20220224" modulus="mod2048" name="server-cert-20220224" nameAlias="" ownerKey="" ownerTag="" regen="no" tp="Own-PKI-Inter-and-Root"/></imdata> |
30 Use new Device Cert:
|
1 2 3 |
<?xml version="1.0" encoding="UTF-8"?><imdata totalCount="1"> <commRsKeyRing dn="uni/fabric/comm-default/https/rsKeyRing" tnPkiKeyRingName="server-cert-20220224" /> </imdata> |
As always, it’s good to see a “200 OK”. ;)
