As you might have noticed, I am playing a lot with NTP these days. Having a networking background I also like Power over Ethernet. So what’s more obvious than using a PoE-powered NTP display for test purposes? ;D
 Let’s have a look at the Meinberg OnTime LED NTP Display. It’s a quite big 7-segment LED display that has only one single interface: the Ethernet port. Nice. Plugging it into a PoE switch it boots up, gets an IPv4 address via DHCP and leverages SNTP to a predefined NTP server (by DNS name) to get the time. Every 60 minutes it refreshes its time from that server again. Quite simple.
I am using this NTP display in two of my recurring network and security training:
- NTP/NTP-Security: When I want to show how easy an attacker can spoof NTP packets by a MITM attack. Or that this IoT device will accept any time, no matter how far it drifts from the actual time since it has no built-in real-time clock to compare with.
- Network basics training: It’s a perfectly easy use case for basic network protocols: DHCP, DNS, NTP. Nice for live capturing with Wireshark.
Configuration
Though the display works out of the box, you may want to configure a couple of things. Two configuration methods are possible: Either via Telnet (uh, yes, Telnet; no SSH available) by using a classical CLI, or via custom DHCP options. While you can do some more stuff with Telnet, the DHCP based approach perfectly fits when you have a couple of those NTP clocks and want to provide basic settings such as the NTP server to use, the timezone, daylight saving time, or 24-hour mode.
The CLI offers some more options. It is quite simple as well. Only a couple of commands such as help, sntp (to set the NTP server), ipconfig (to set the IPv4 address), stats, dhcpconfig (to see the overrides by DHCP options), or config (to see the complete configuration). Following is the “config” output, which gives a glance about all options:
|
1 2 3 4 5 6 7 8 9 10 11 12 13 14 15 16 17 18 19 20 21 22 23 24 25 26 27 28 29 30 31 32 33 34 35 36 37 38 39 40 41 42 43 44 45 46 47 48 49 50 51 52 53 54 55 56 57 58 59 60 61 62 63 64 65 66 67 |
iclock-32e />config The Persistent Clock Configuration file contains: -------------------------------------------------- # Inova OnTime Clock Configuration File # Clock Display Properties Is12Hour=false ShowAMPM=false ShowSeconds=true ShowHHMMColon=true # User Properties UserPW=timely # IP Configuration DHCPEnable=true DHCPConfigOptionNum=230 IPAddress= SubnetMask= GatewayAddress= Hostname=iclock-32e Domainname= PrimaryDNS=0.0.0.0 SecondaryDNS=0.0.0.0 DNSTimeoutMS=0 ShowIPAtBoot=true ShowPageTimeMS=2000 # SNTP Configuration SntpHost=ntp3-legacy-ip.weberlab.de SntpPort=123 SntpUpdateTimeSec=3600 SntpTimeoutMS=10000 SntpRetryTimeMS=90000 SntpHost2=none # Timezone Properties TimezoneOffset=1 TimezoneOffsetMins=0 # Daylight Saving Time Properties # Day of the Week (1 = Sunday, 0 means use exact Day of Month) # Change on the DOW on or after this Day of the Month (special cases apply) # Months start at 0 = January # Time is local time in hours (0-23) UseDST=true StartDOW=1 StartDay=-1 StartMonth=2 StartTime=1 EndDOW=1 EndDay=-1 EndMonth=9 EndTime=1 # Inova OnTime Management Properties CloudServer= SiteToken= InovaMgmtDHCPOptionNum=231 # Inova OnTime Telnet Properties OnTimeTelnetEnabled=true -------------------------------------------------- These clock configuration settings do not reflect DHCP based overrides. Use the dhcpconfig command to view the override settings. |
Sample Run
What I love about this clock is its easy usability:
And by the way: It consumes about 6 Watts.
Disabling Telnet
Oh yeah, at least there is a “disabletelnet” command. This greatly improves security. Without any confirmation the command immediately worked:
|
1 2 3 4 |
iclock-32e />disabletelnet Telnet has been disabled. The clock will reboot in ten seconds. |
After some tests that telnet is indeed disabled, I wanted to enable it again. But how? Nothing in the documentation. Finally, I found how to reenable it on the Novanex support site, stating: “Return the clock to Inova Solutions where we can perform a factory reset for you for a support charge, or contact technical support.” Hence I opened a support ticket and here is how you can factory reset the device:
To my mind, this is a good solution to keep the clock tamper-proof, since it will probably reside in a public location. No single button/switch at the clock at all, while no single IP connection to it, as well.
Wireshark
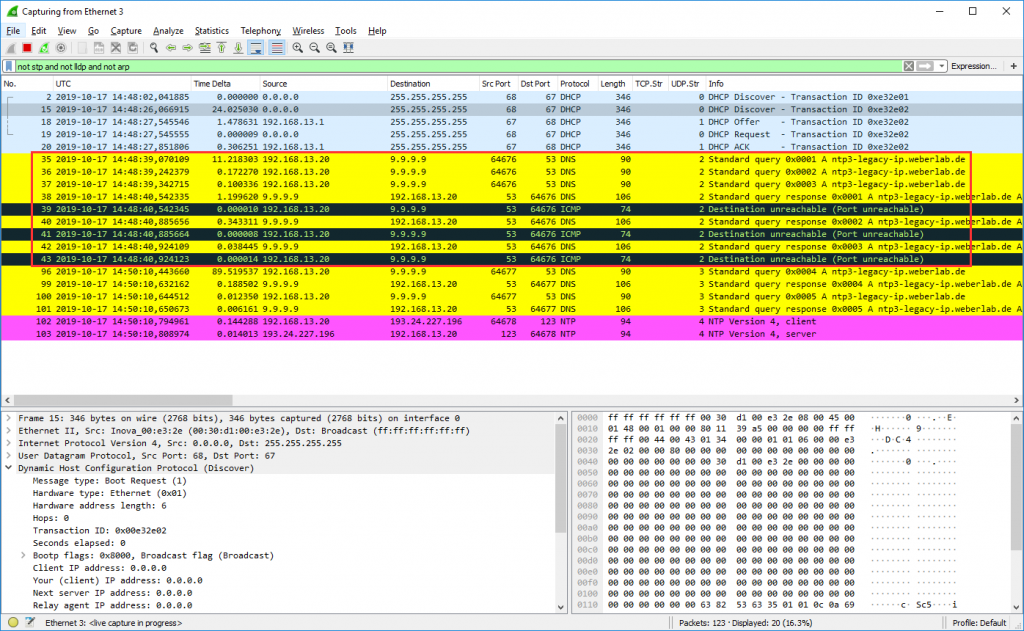
As already pointed out, I am using this clock for demo purposes during my network and/or NTP talks. You don’t have that many disturbing packets on it, but only a very straightforward run of DHCP, DNS, and NTP. (And probably some STP and LLDP packets from the switch itself.) That’s why it’s easy for beginners to have a look at live packet captures.
This is what the bootup looks like: (Though there is a small error in waiting only 1 second for DNS to reply, while any packets after that second are “port unreachables”.)
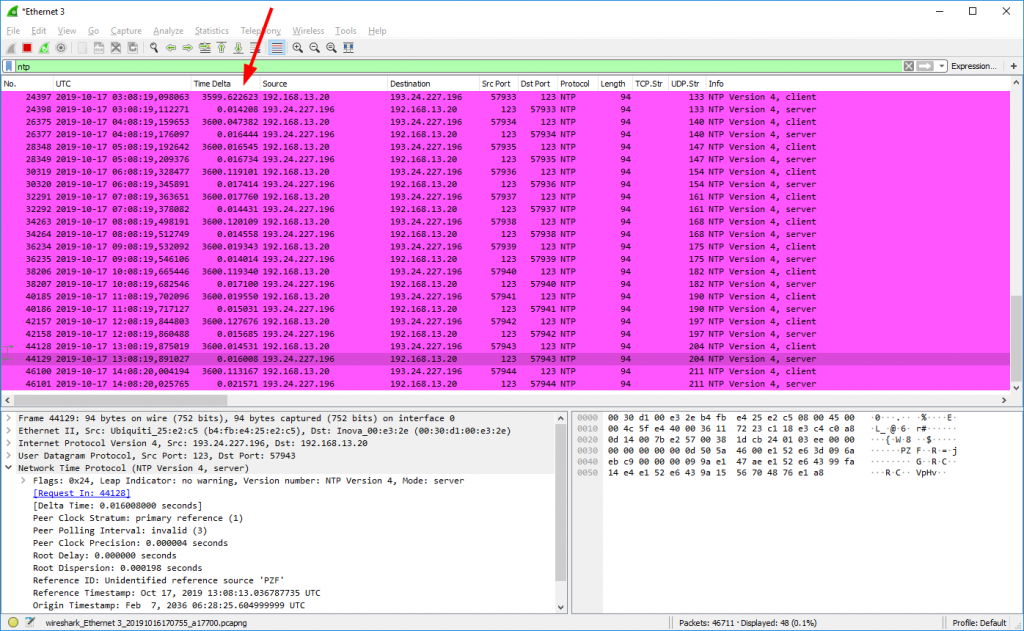
After that, every hour a single NTP request is sent (default setting). That’s it.
Portscan with Nmap
After I disabled Telnet I did a basic Nmap scan to check if there are some (hidden) opened ports. No single one was found. Good. Details:
|
1 2 3 4 5 6 7 8 9 10 11 12 13 14 15 16 17 18 19 20 |
sudo nmap -sS -sU -A -oN PoE-clock-nmap-scan.txt -T2 192.168.11.22 Starting Nmap 7.60 ( https://nmap.org ) at 2019-11-18 09:08 UTC Nmap scan report for iclock-32e.weberlab.de (192.168.11.22) Host is up (0.00026s latency). All 2000 scanned ports on iclock-32e.weberlab.de (192.168.11.22) are closed MAC Address: 00:30:D1:00:E3:2E (Inova) Warning: OSScan results may be unreliable because we could not find at least 1 open and 1 closed port Device type: media device Running: Denon embedded OS CPE: cpe:/h:denon:avr-2113 OS details: Denon AVR-2113 audio receiver Network Distance: 1 hop TRACEROUTE HOP RTT ADDRESS 1 0.26 ms iclock-32e.weberlab.de (192.168.11.22) OS and Service detection performed. Please report any incorrect results at https://nmap.org/submit/ . Nmap done: 1 IP address (1 host up) scanned in 808.21 seconds |
No IPv6, no SSH
Just to say it again: This clock does not support IPv6 nor SSH. Definitely not what I am expecting these days. Ok, it’s an IoT device. Hence, I actually was expecting it. ;)
However, I’m quite happy with this clock. It perfectly fits my use case and a lot of people respond to that.


Thank you as always for your shared Knowledge.