
Johannes published a basic NAT46 configuration for a Fortigate firewall with FortiOS 7.0 some time ago. I run such a service (legacy IPv4 access to IPv6-only resources) since FortiOS 5.6, which means more than six years; lastly with FortiOS 6.4. It’s running for more than 100 servers without any other problems as we see them with IPv4 only or dual stack services.
But we weren’t happy with the basic configuration example by Fortinet. We wanted some NAT46 sample configuration with more details, that is: including the original source IPv4 address within the synthesized/SNATted IPv6 address. More in this post, after a short story about my way to a running nat46 configuration with port forwarding in FortiOS 7.2.x.
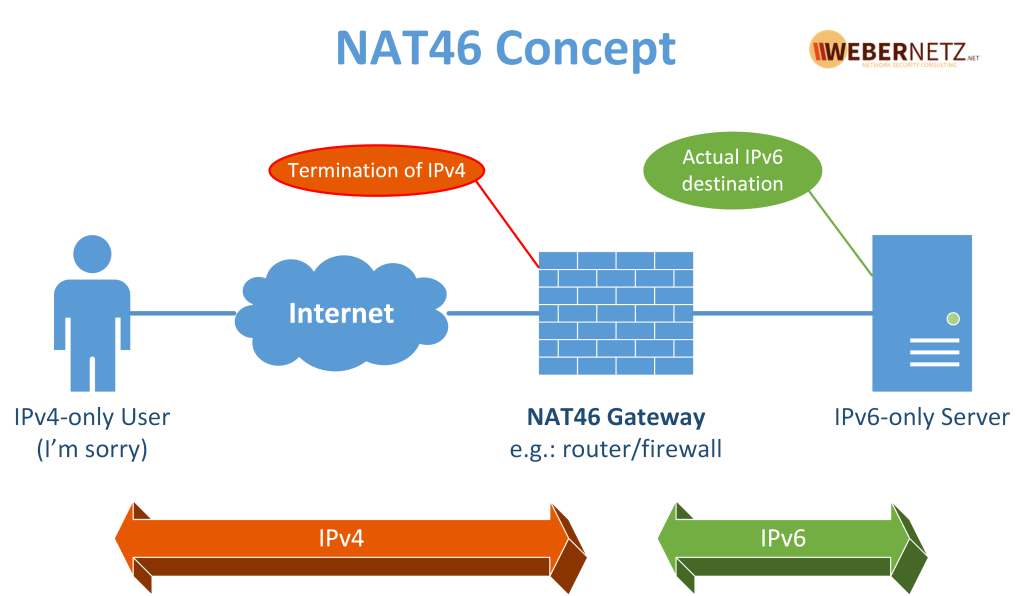
(Please note: this post is about NAT46, not NAT64, which is more common. :))
We operate a firewall which is doing NAT46 for many of our hosting services. All servers have IPv6 GUA (Global Unicast Addresses) and we are happy with the configuration. It looks like this:
Bear the Challenge and Update the FortiGate
Now, Fortinet support asked me, because of an issue we opened a ticket, to update my productive firewall (with the nat46 configuration!) to FortiOS 7.0 or 7.2 soon. I didn’t want to do this step since I read the first 7.0.1 release notes in summer 2021. This is because Fortinet changed the whole NAT64 and NAT46 configuration with policy46, vip46 and vip64 and so on. You will lose all of your configuration for IPv4-IPv6 translation features, not written there word by word, but as a result. They call this “simplify policy and routing configurations” at Fortinet in their Release Notes. And of course, as you already expect: the transfer of the nat46/nat64 configuration from a 6.x operating system to the new 7.x configuration is not a simple clicking around.

During the update process, there is no automatic transfer of the ip pools for nat64 and nat46, and no transfer of the nat64 and nat46 policies. After the first boot with 7.0.x, you only get a hint like this on the console:
|
1 2 |
The config file may contain errors, Please see details by the command 'diagnose debug config-error-log read' |
As I always strongly recommend when you get this line: run the debug command before the next reboot! There you find a short hint about the ignored transfer of some configuration sections; in this case, as announced in the release notes:
|
1 2 3 4 5 6 7 |
fgtos70 # diagnose debug config-error-log read → → "set" "gui-nat46-64" "enable" @ root.system.settings:command parse error (error -61) → → "config" "firewall" "vip46" @ root:command parse error (error -61) → → "config" "firewall" "policy64" @ root:command parse error (error -61) → → "config" "firewall" "policy46" @ root:command parse error (error -61) → → "config" "system" "nat64" @ root:command parse error (error -61) fgtos70 # |
In my case, the configuration had around 800 lines less… Ouch!
I didn’t want to wait and keep many services of our hosting offline for a longer time, so an additional reboot and an update from 7.0.13 to 7.2.6 was the next task.
With the help of a self-written search-and-replace script and some additional, manual changes, I had a text file with my whole nat46 configuration which I could import without any warnings or errors. BE HAPPY.
Optimized nat46 Configuration
Unfortunately, there are no examples with the well-known NAT46/SIIT IPv6-prefix 64:ff9b::/96 in many documentations. This 64:ff9b::/96 range is 32-bit wide (96 + 32 = 128 bit) and represents the whole (32-bit wide) IPv4 range in IPv6, used for NAT46 (and NAT64) and SIIT (see RFC 6052 and RFC 7755 and many others).
The IPv4 address is shown as a hexadecimal address in the last two hextets of the IPv6 address. This means: if you have the (example) IPv4 address 9.9.9.9 it converts to 64:ff9b::909:909 in IPv6 if you use it for NAT46/NAT64; IPv4 address 10.11.12.13 is translated to 64:ff9b::a0b:c0d. And one more example: IPv4 192.0.2.240 is 64:ff9b::c000:2f0. This is also called a synthesized IPv4 address when the IPv4 address is included in the 64:ff9b address.
If you create an ippool6 object in FortiOS with “startip 64:ff9b::” and “endip 64:ff9b::ffff:ffff“, (remember: the whole 32-bit IPv4 Internet!) and use this IPv6 range as a pool for the NAT46 (poolname6 in the policy for NAT46), the Fortigate will include the synthesized IPv4 source address as the IPv6 source address.
The IPv6-only service you operate behind your nat46 firewall can write this address to the log and may help you solve problems. This is the way IPv6-only servers can still provide the service for IPv4-only clients.

Configuration Example with NAT46 and Port-Forwarding
Here is my configuration example, with port-forwarding by a nat46 policy. First, we must create an IPv6 pool with a size of 32 bit to nat the (whole source) IPv4 address to a (destination) IPv6 address:
|
1 2 3 4 5 6 7 8 |
config firewall ippool6 edit "IPv6pool-for-nat46-with-full-32bit-IPv4-range" set startip 64:ff9b::0 set endip 64:ff9b::ffff:ffff set comments "common NAT46-NAT64 range" set nat46 enable next end |
The next step is a service object. We need one virtual IP (vip) object for each port/service which has to be mapped from an IPv4 address to an IPv6 address. Here is the example for HTTP and HTTPS:
|
1 2 3 4 5 6 7 8 9 10 11 12 13 14 15 16 17 18 19 20 21 22 |
config firewall vip edit "nat46_testA:80" set extip 192.0.2.39 set nat44 disable set nat46 enable set extintf "v100" set portforward enable set ipv6-mappedip 2001:db8:de0:f270::200 set extport 80 set ipv6-mappedport 80 next edit "nat46_testA:443" set extip 192.0.2.39 set nat44 disable set nat46 enable set extintf "v100" set portforward enable set ipv6-mappedip 2001:db8:de0:f270::200 set extport 443 set ipv6-mappedport 443 next end |
Now we create an object for port-forwarding within the NAT46 object. The IPv4-address is 192.0.2.39, IPv4 port is 22200 and the IPv6 port is 22 (default SSH):
|
1 2 3 4 5 6 7 8 9 10 11 12 |
config firewall vip edit "nat46_testA:22" set extip 192.0.2.39 set nat44 disable set nat46 enable set extintf "v100" set portforward enable set ipv6-mappedip 2001:db8:de0:f270::200 set extport 22200 set ipv6-mappedport 22 next end |
For this type of port-forwarding an additional custom service object is required. This example is to forward port 22200, but not defined for which destination port:
|
1 2 3 4 5 6 7 |
config firewall service custom edit "nat46fwd22200tcp" set category "nat46forward" set comment "in use for nat46 port forward" set <strong>tcp-portrange 22200</strong> next end |
Finally, we can combine all the created objects in policies:
|
1 2 3 4 5 6 7 8 9 10 11 12 13 14 15 16 17 18 19 20 21 22 23 24 25 26 27 28 29 30 31 32 33 34 |
config firewall policy edit 461 set srcintf "v100" set dstintf "v503" set action accept set nat46 enable set srcaddr "ExternalTestIPv4" set dstaddr "nat46_testA:80" "nat46_testA:443" set srcaddr6 "all" set dstaddr6 "all" set schedule "always" set service "HTTP" "HTTPS" set auto-asic-offload disable #just for better demonstration, set to enable for production set ippool enable set poolname6 "IPv6pool-for-nat46-with-full-32bit-IPv4-range" set comments "HTTP/HTTPS access policy" next edit 462 set srcintf "v100" set dstintf "v503" set action accept set nat46 enable set srcaddr "ExternalTestIPv4" set dstaddr "nat46_testA:22" set srcaddr6 "all" set dstaddr6 "all" set schedule "always" set service "nat46fwd22200tcp" "SSH" #we need both, the external tcp-port and the internal tcp-port set auto-asic-offload disable #just for better demonstration, set to enable for production set ippool enable set poolname6 "IPv6pool-for-nat46-with-full-32bit-IPv4-range" set comments "SSH access policy with port forwarding" next end |
In policy 462 you can see the port-forwarding configuration. We need the service object nat46fwd22200tcp for the IPv4 mapped port and the SSH service object for the destination IPv6 service. Read the next section to see the internal process to understand, why the configuration needs this.

With this configuration, the IPv6-only daemon for SSH or HTTP/HTTPS can write the synthesized IPv4 address in the log and the marketing department can follow a client connection through the logs.
Until now I could not test the real effect of changing srcaddr6 and dstaddr6 from all to other values. Looking forward to get some feedback!
Bonus: Start of a Data Flow of a nat46 Connection
If you have a detailed look at the following lines (built-in tcpdump in FortiOS), you can see a new, hidden interface called naf.root (I expect root is the name of the vdom, it might be different if you have other vdoms) which is in use to help to translate IPv4 in IPv6 and back:
- In line 4 the test-ssh-client opens an IPv4 connection to port 22200 with a syn.
- In line 5 the syn packet is routed through the naf.root interface (still IPv4) and comes back in line 6 as an IPv6 packet to destination port 22 for SSH.
- The packet was sent to the vlan 503 (line 7) which uses a port channel (line 8) and leaves the unit on physical interface x3 (line 9).
All other lines are very similar and I am only publishing a part of the connection here. And I’m very sorry: I did not understand why there is a naf.root out in line 5 and why it is a naf.root in in line 6; same for all other lines with naf.root. Feedback is welcome!
|
1 2 3 4 5 6 7 8 9 10 11 12 13 14 15 16 17 18 19 20 21 22 23 24 25 26 27 |
fgtos7 # diagnose sniffer packet any 'host 192.0.2.46 or 64:ff9b::c000:22e' 4 500 l interfaces=[any] filters=[host 192.0.2.46 or 64:ff9b::c000:22e] 11:17:41.267612 v100 in 192.0.2.46.59172 → 192.0.2.39.22200: syn 160445192 11:17:41.267633 naf.root out 192.0.2.46.59172 → 192.0.2.39.22200: syn 160445192 11:17:41.267635 naf.root in 64:ff9b::c000:22e.59172 → 2001:db8:de0:f270::200.22: syn 160445192 11:17:41.267648 v503 out 64:ff9b::c000:22e.59172 → 2001:db8:de0:f270::200.22: syn 160445192 11:17:41.267649 PCdmz out 64:ff9b::c000:22e.59172 → 2001:db8:de0:f270::200.22: syn 160445192 11:17:41.267650 x3 out 64:ff9b::c000:22e.59172 → 2001:db8:de0:f270::200.22: syn 160445192 11:17:41.267846 v503 in 2001:db8:de0:f270::200.22 → 64:ff9b::c000:22e.59172: syn 4075988132 ack 160445193 11:17:41.267869 naf.root out 2001:db8:de0:f270::200.22 → 64:ff9b::c000:22e.59172: syn 4075988132 ack 160445193 11:17:41.267870 naf.root in 192.0.2.39.22200 → 192.0.2.46.59172: syn 4075988132 ack 160445193 11:17:41.267879 v100 out 192.0.2.39.22200 → 192.0.2.46.59172: syn 4075988132 ack 160445193 11:17:41.267880 PCwan out 192.0.2.39.22200 → 192.0.2.46.59172: syn 4075988132 ack 160445193 11:17:41.267880 x2 out 192.0.2.39.22200 → 192.0.2.46.59172: syn 4075988132 ack 160445193 11:17:41.279083 v100 in 192.0.2.46.59172 → 192.0.2.39.22200: ack 4075988133 11:17:41.279088 naf.root out 192.0.2.46.59172 → 192.0.2.39.22200: ack 4075988133 11:17:41.279089 naf.root in 64:ff9b::c000:22e.59172 → 2001:db8:de0:f270::200.22: ack 4075988133 11:17:41.279092 v503 out 64:ff9b::c000:22e.59172 → 2001:db8:de0:f270::200.22: ack 4075988133 11:17:41.279093 PCdmz out 64:ff9b::c000:22e.59172 → 2001:db8:de0:f270::200.22: ack 4075988133 11:17:41.279094 x3 out 64:ff9b::c000:22e.59172 → 2001:db8:de0:f270::200.22: ack 4075988133 11:17:41.284112 v100 in 192.0.2.46.59172 → 192.0.2.39.22200: psh 160445193 ack 4075988133 11:17:41.284116 naf.root out 192.0.2.46.59172 → 192.0.2.39.22200: psh 160445193 ack 4075988133 11:17:41.284117 naf.root in 64:ff9b::c000:22e.59172 → 2001:db8:de0:f270::200.22: psh 160445193 ack 4075988133 11:17:41.284120 v503 out 64:ff9b::c000:22e.59172 → 2001:db8:de0:f270::200.22: psh 160445193 ack 4075988133 11:17:41.284121 PCdmz out 64:ff9b::c000:22e.59172 → 2001:db8:de0:f270::200.22: psh 160445193 ack 4075988133 11:17:41.284122 x3 out 64:ff9b::c000:22e.59172 → 2001:db8:de0:f270::200.22: psh 160445193 ack 4075988133 |
Further sources: SIIT task of Tore Anderson on RIPE69 (Nov. 2014).
Photo by Ian Taylor on Unsplash.