You probably know already the concept of the Pi-hole. If not: It’s a (forwarding) DNS server that you can install on your private network at home. All your clients, incl. every single smartphone, tablet, laptop, and IoT devices such as smart TVs or light bulb bridges, can use this Pi-hole service as their DNS server. Now here’s the point: it not only caches DNS entries, but blocks certain queries for hostnames that are used for ads, tracking, or even malware. That is: You don’t have to use an ad- or track-blocker on your devices (which is not feasible on smart TVs or smartphone apps, etc.), but you’re blocking these kinds of sites entirely. Nice approach!
Yes, there are already some setup tutorials for the Pi-hole out there. However, it’s not only about installing the mere Pi-hole, but setting it up with your own recursive DNS server (since the default installation forwards to public DNS servers), using DNSSEC, and adding some more adlists. That’s why I am listing my installation procedure here as well. However, it’s not a complete beginners guide. You’ll need some basic Linux know-how.
I am using a Raspberry Pi 3 B+ Rev 1.3 with Raspberry Pi OS for this setup. (In the meantime I’m running Pi-hole on my Intel NUC with Ubuntu server.)
Basic Setup
This installation is copied from the original Pi-hole documentation:
|
1 2 3 |
git clone --depth 1 https://github.com/pi-hole/pi-hole.git Pi-hole cd "Pi-hole/automated install/" sudo bash basic-install.sh |
Well, that was easy. It will ask you some questions though. Note the lines at the end about your admin password and how to access the console:
|
1 2 3 4 |
[i] Web Interface password: Q_1kJLS9 [i] This can be changed using 'pihole -a -p' [i] View the web interface at http://pi.hole/admin or http://192.168.7.53/admin |

Own Recursive DNS Server & DNSSEC
By default, Pi-hole uses some public DNS servers for its name resolution. I don’t like that concept because you’re giving 100 % of your queries to some third parties. I prefer using my own recursive DNS server. (Yes, I know that your upstream ISP is still able to see your queries, but that’s by far better than using 8.8.8.8 or the like.) The recursive DNS server of choice is Unbound. The following installation procedure is covered on the Pi-hole site as well.
|
1 2 |
sudo apt update sudo apt install unbound |
While this installation is working, the Unbound service is not able to start yet because the UDP/TCP port 53 is already used by Pi-hole. You have to use an adapted config anyway:
|
1 |
sudo nano /etc/unbound/unbound.conf.d/pi-hole.conf |
Paste these lines:
|
1 2 3 4 5 6 7 8 9 10 11 12 13 14 15 16 17 18 19 20 21 22 23 24 25 26 27 28 29 30 31 32 33 34 35 36 37 38 39 40 41 42 43 44 45 46 47 48 49 50 51 52 53 54 55 56 57 58 59 60 61 62 63 64 65 |
server: # If no logfile is specified, syslog is used # logfile: "/var/log/unbound/unbound.log" verbosity: 1 interface: ::1 interface: 127.0.0.1 port: 5335 do-ip4: yes do-udp: yes do-tcp: yes do-ip6: yes # You want to leave this to no unless you have *native* IPv6. With 6to4 and # Terredo tunnels your web browser should favor IPv4 for the same reasons prefer-ip6: yes # Use this only when you downloaded the list of primary root servers! # If you use the default dns-root-data package, unbound will find it automatically #root-hints: "/var/lib/unbound/root.hints" # Trust glue only if it is within the server's authority harden-glue: yes # Require DNSSEC data for trust-anchored zones, if such data is absent, the zone becomes BOGUS harden-dnssec-stripped: yes # Don't use Capitalization randomization as it known to cause DNSSEC issues sometimes # see https://discourse.pi-hole.net/t/unbound-stubby-or-dnscrypt-proxy/9378 for further details use-caps-for-id: no # Reduce EDNS reassembly buffer size. # IP fragmentation is unreliable on the Internet today, and can cause # transmission failures when large DNS messages are sent via UDP. Even # when fragmentation does work, it may not be secure; it is theoretically # possible to spoof parts of a fragmented DNS message, without easy # detection at the receiving end. Recently, there was an excellent study # >>> Defragmenting DNS - Determining the optimal maximum UDP response size for DNS <<< # by Axel Koolhaas, and Tjeerd Slokker (https://indico.dns-oarc.net/event/36/contributions/776/) # in collaboration with NLnet Labs explored DNS using real world data from the # the RIPE Atlas probes and the researchers suggested different values for # IPv4 and IPv6 and in different scenarios. They advise that servers should # be configured to limit DNS messages sent over UDP to a size that will not # trigger fragmentation on typical network links. DNS servers can switch # from UDP to TCP when a DNS response is too big to fit in this limited # buffer size. This value has also been suggested in DNS Flag Day 2020. edns-buffer-size: 1232 # Perform prefetching of close to expired message cache entries # This only applies to domains that have been frequently queried prefetch: yes # One thread should be sufficient, can be increased on beefy machines. In reality for most users running on small networks or on a single machine, it should be unnecessar> num-threads: 1 # Ensure kernel buffer is large enough to not lose messages in traffic spikes so-rcvbuf: 1m # Ensure privacy of local IP ranges private-address: 192.168.0.0/16 private-address: 169.254.0.0/16 private-address: 172.16.0.0/12 private-address: 10.0.0.0/8 private-address: fd00::/8 private-address: fe80::/10 |
Restart and verify the running service:
|
1 2 |
sudo systemctl restart unbound sudo systemctl status unbound |
Furthermore, create the following config file:
|
1 |
sudo nano /etc/dnsmasq.d/99-edns.conf |
and add this single line:
|
1 |
edns-packet-max=1232 |
Since the DNS from Unbound is now running on port 5335, use this command to test it:
|
1 |
dig pi-hole.net @::1 -p 5335 |
And since DNSSEC validation is turned on, you should see the “ad” flag for DNSSEC signed FQDNs, while a “SERVFAIL” for DNSSEC errors:
|
1 2 |
dig sigok.verteiltesysteme.net @::1 -p 5335 dig sigfail.verteiltesysteme.net @::1 -p 5335 |
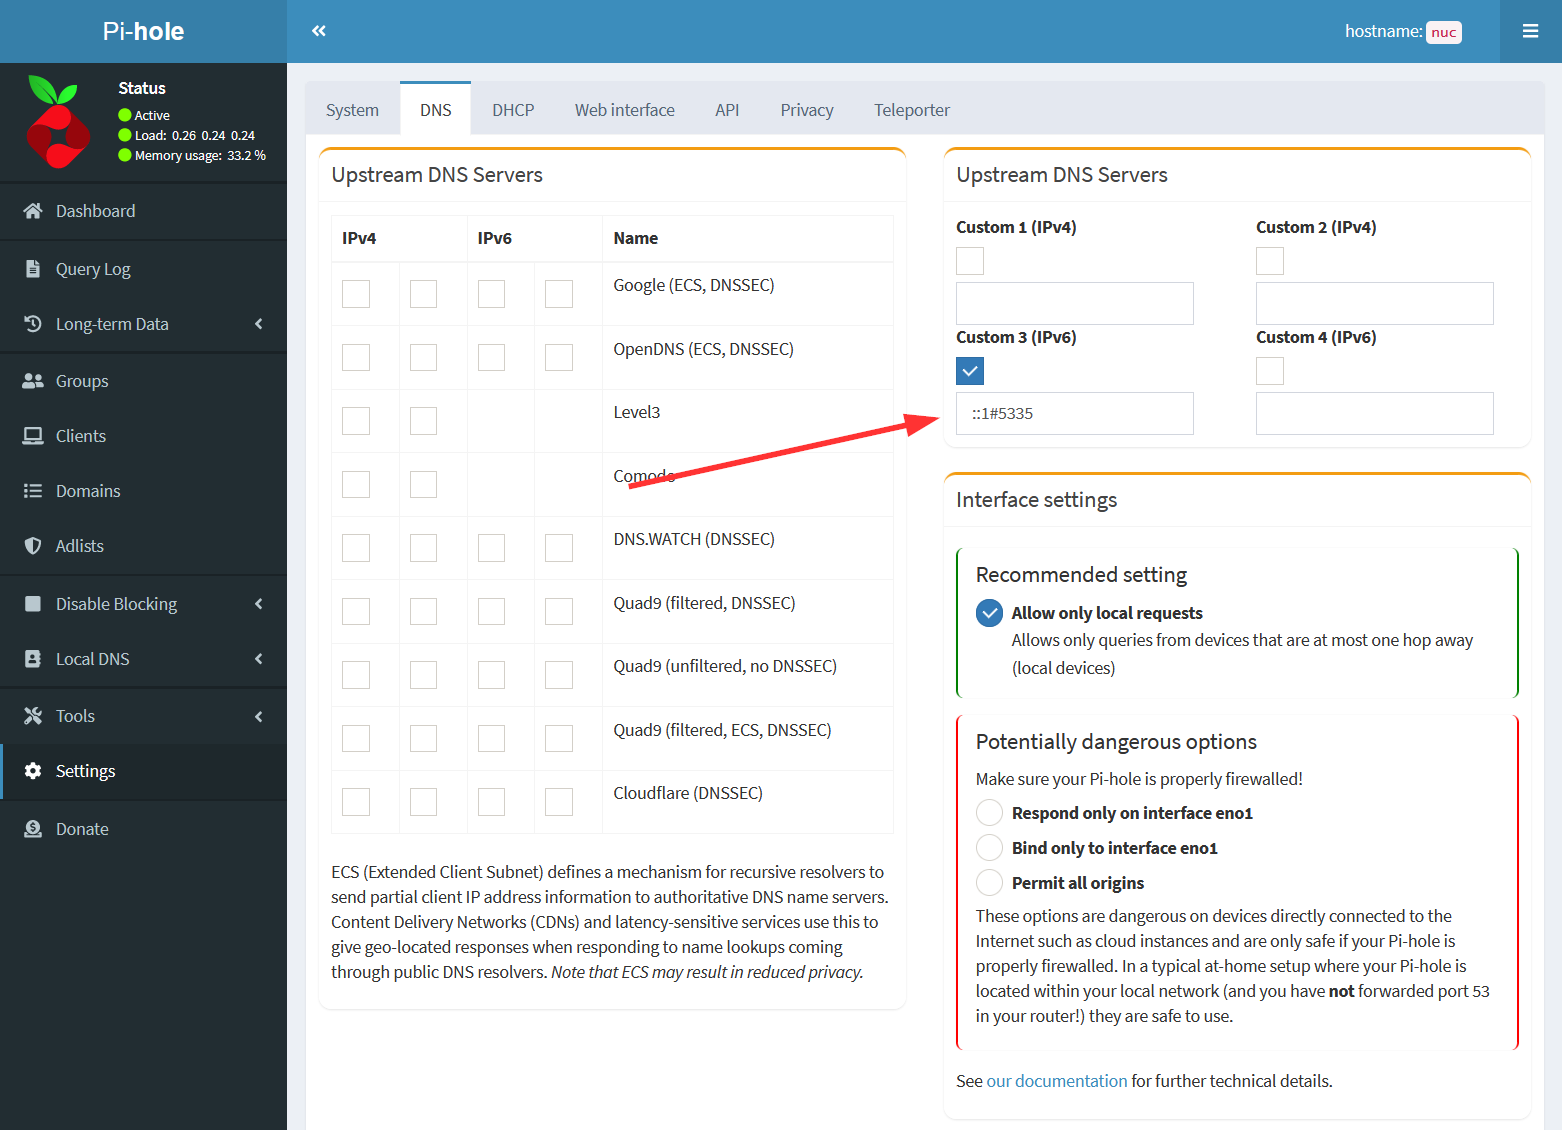
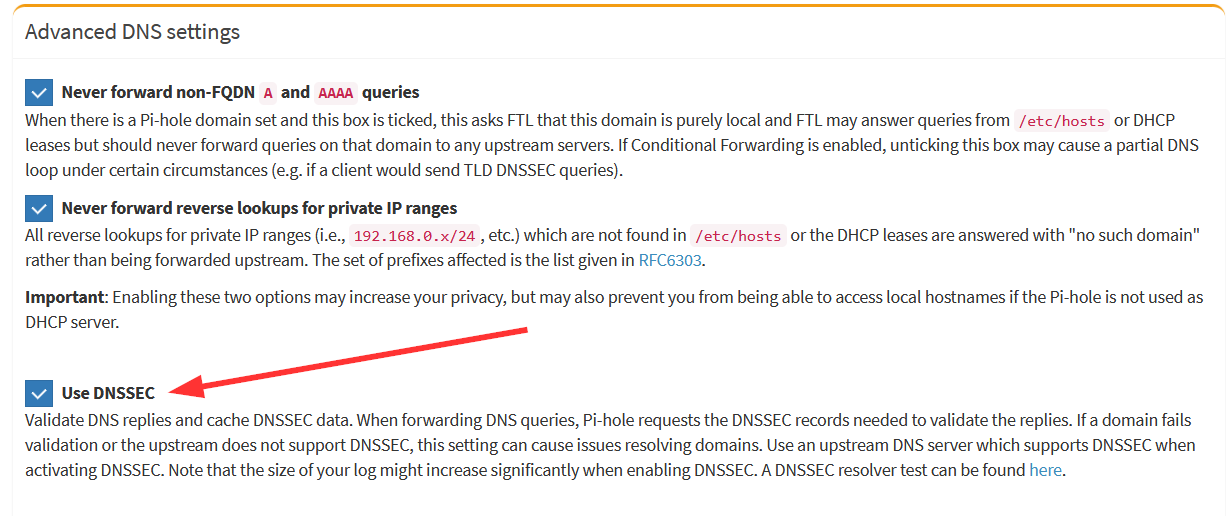
Use this DNS service within Pi-hole by enabling it in this way. Furthermore, check “Use DNSSEC” below on the same page:
Including More Lists Automatically
Right now you are using one single ad-list on your Pi-hole. While that’s a good starting point, you definitely want to add some more lists. Note that once a list is added, Pi-hole will automatically update the list entries. What we are doing right now is to automatically add more lists in general. Two steps are required for this: 1) A script that checks a “list of lists” in order to add them into the Pi-hole. I am using this: pihole-updatelists:
|
1 2 3 4 |
sudo apt update sudo apt-get install php-cli php-sqlite3 php-intl php-curl wget -O - https://raw.githubusercontent.com/jacklul/pihole-updatelists/master/install.sh | sudo bash |
Note the two last lines during the installation:
|
1 2 |
Enabling and starting pihole-updatelists.timer... Created symlink /etc/systemd/system/timers.target.wants/pihole-updatelists.timer /etc/systemd/system/pihole-updatelists.timer. |
That is: it installs a timer that runs once a week in order to update the lists.
2) Adding a “list of lists”. You first have to choose such a list. Keep in mind that you must trust the source of this list! I have chosen “The Firebog” project which lists some lists out of the following categories: suspicious, advertising, tracking & telemetry, and malicious. With the following list, all the lists that are checked (ticked) from their site are listed: https://v.firebog.net/hosts/lists.php?type=tick. Haha, how many times have I said “lists”? ;)
Add this “list of lists” to the pihole-updatelists configuration like this:
|
1 2 3 |
sudo nano /etc/pihole-updatelists.conf ADLISTS_URL="https://v.firebog.net/hosts/lists.php?type=tick" |
That’s it. You can either wait till next Saturday to have it updated, or you do it manually for this first time (of course!) with the following command:
|
1 |
pihole-updatelists |
After that you’ll see some more configured adlists at Group Management -> Adlists:
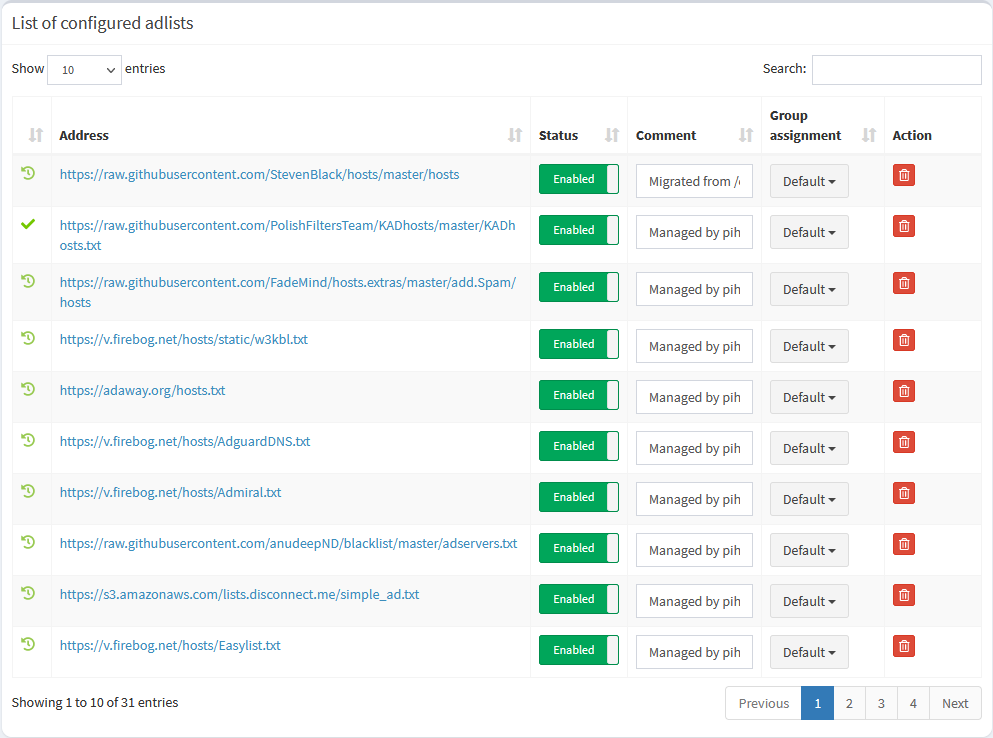
The “Domains on Blocklist” counter at the upper right should increase significantly as well. In my case, it’s greater than 250.000 entries. Nice!

Miscellaneous
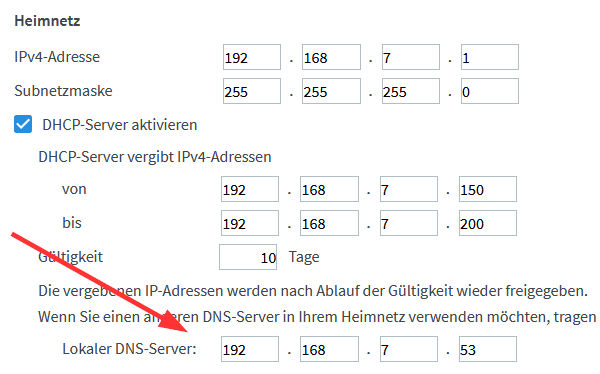
By the way: Don’t forget to change your DHCP settings on your router to use the Pi-hole as the DNS server. ;) Here’s what it looks like on an AVM Fritzbox (IPv4 and IPv6) and on a Ubiquiti UniFi network:


Here’s a little pitfall I ran into at least two times: If your Pi has no valid time (e.g. when it was offline for a couple of days), while you’re using DNSSEC (as I do!), you’ll have a chicken-and-egg problem. The NTP service won’t be able to look up its NTP server addresses because of DNSSEC failures (due to the wrong time), while DNSSEC will never be able to validate DNS responses unless NTP corrects the local time. Arg! The only way to solve this is to manually correct the time on the pi with: sudo date -s '2021-01-04 13:04:00', click for details. If you’re interested in the DNSSEC validation process on the Pi-hole, read this: “Understanding DNSSEC validation using Pi-hole’s Query Log“.
Final tip: I recommend the free Pi-hole Remote App for iOS. It works like a charm and is completely ad-free. Wow. Here are some screenshots:


Updating it!
When you encounter such a hint at the bottom of your Web GUI:

then it’s time for an update. ;) Note: I explicitly don’t want to automate my updates here, because I want to be sure that I can fix any possible problems. This won’t be the case if the Pi-hole updates itself while I am on a business trip.
As the note already says, simply use pihole -up to update it. This looks like this:
|
1 2 3 4 5 6 7 8 9 10 11 12 13 14 15 16 17 18 19 20 21 22 23 24 25 |
weberjoh@nuc01-cmk:~$ pihole -up [sudo] password for weberjoh: [✓] Update local cache of available packages [i] Existing PHP installation detected : PHP version 7.4.3 [✓] Checking for git [✓] Checking for iproute2 [✓] Checking for whiptail [✓] Checking for ca-certificates [i] Checking for updates... [i] Pi-hole Core: update available [i] Web Interface: update available [i] FTL: update available [...] [✓] Pi-hole blocking is enabled [i] The install log is located at: /etc/pihole/install.log Update Complete! Current Pi-hole version is v5.8.1 Current AdminLTE version is v5.10.1 Current FTL version is v5.13 |
I’m ending this story with a screenshot from my Pi-hole dashboard. I really like it:

I wish you a blessed Christmas. Jesus is born <- that’s what Christmas is all about!
Photo by Kurt Cotoaga on Unsplash.
Hi,
Wondering if you can make a tutorial on Pi-hole + dnscrypt-proxy + unbound all together on a VPS. I don’t believe anyone has done that yet.
Is dnscrypt-proxy + unbound even needed?
Thanks,
Hey Jim. What exactly do you mean by “VPS”? My tutorial should work on any Linux-based system.
And what’s the dnscrypt-proxy for? As far as I know, encrypted DNS would not make sense here at the Pi-hole. DNS queries to authoritative name servers are not encrypted by now, while queries from my own (home) clients to the Pi-hole are a little too much. ;) Or do you have other scenarios in your mind concerning dnscrypt-proxy?
Ciao
Johannes
I’m trying to accomplish the below mindmap .
https://imgur.com/GiJRt6d
> What exactly do you mean by “VPS”?
Just any linux server like on AWS, DO etc
> And what’s the dnscrypt-proxy for? As far as I know, encrypted DNS would not make sense here at the Pi-hole. DNS queries to authoritative name servers are not encrypted by now
The dnscrypt-proxy is for encrypting DNS traffic going out to ClouldFlare or Quad DNS. Its just another way of DNS-over-HTTPS.
It seems like I may not need unbound when the traffic is already encrypted by dnscrypt-proxy or when using a authoritative name server like unbound.
Great article, inspired me to try once again to set this up (in my slightly more complicated environment where I have my own bind9-based internal DNS on the same machine that should run pi-hole).
Seems to work nice – one question: is there a way to change the DNS name for the host running this? It is “pi.hole” and I wonder when the first malware checks whether a pi.hole instance is running the DNS in a network …
Hey Heiko. Interesting question. If the malware will stop doing malicious stuff if it finds a “pi.hole”, then I’ll be fine with it. ;)
Anyway, I googled a bit. There are two parts to your question:
1) Changing pi-hole in a way that it does NOT respond to A/AAAA queries for “pi.hole”: I haven’t found anything for this. It seems that this is pretty hard coded. In the GUI under Local DNS -> DNS Records you can see “The order of locally defined DNS records is: 1. The device’s host name and pi.hole”. Maybe you have to do some more googling ;)
2) Changing pi-hole in a way that it does NOT respond with a PTR of “pi.hole” when queried with the IPv4/IPv6 addresses of itself. This can be changed, see here: https://docs.pi-hole.net/ftldns/configfile/ . The option is, for example:
PIHOLE_PTR=HOSTNAME
followed by a restart of the FTL:
sudo systemctl restart pihole-FTL.service
In fact, my Windows nslookup changed from:
C:\Users\Johannes Weber>nslookupStandardserver: pi.hole
Address: 192.168.7.53
to:
C:\Users\Johannes Weber>nslookupStandardserver: nuc01-cmk
Address: 192.168.7.53
since the hostname of my device is “nuc01-cmk”. Great.
Thanks a lot, my own research came up with the same results (except for the reverse lookup part), pi.hole is hardcover.
Pretty strange that they give away the fact that pi.hole is there so easily, just to gain a little bit of convenience.
Anyhow, it is a great piece of software and works great over here!
Well, in the first place it’s a piece of software that should be installed *easily* for *normal* users, using it as an ad-blocker. Your request is based on an advanced malware protection idea. ;)
Hi,
I get a the following error message, do you know why and what I can do?
Pi-hole’s Lists Updater by Jack’lul
https://github.com/jacklul/pihole-updatelists
Opened gravity database: /etc/pihole/gravity.db (0 B)
Exception: SQLSTATE[HY000]: General error: 1 no such table: adlist
Thanks
Hi RB. At which point are you getting this error?
I got the error displayed under the item “Group managment”. And apparently a defect of the /etc/pihole/gravity.db was the reason. After I deleted the original one and restarted it worked.
Thank you very much! This is so far the most complete guide written about setting pi-hole as recursive dns server.
Hi Johannes,
Question about PiHole and Palo Alto:
I have noticed that my PA-220 is dropping packets, but I can’t explain why. It always happens when DNSSEC is activated in PiHole and certain DNS names are to be resolved. Examples: youtu.be or w2g.tv
I suspect it only happens when DNS responses are (too) long and fragmented and therefore TCP is used. But I am not sure.
Greetings,
Simon
Hey Simon. Yes, to be honest, I ran into multiple false positive blockings if a recursive DNS server operates behind a next-generation firewall that is aware of so many things. 😂 It’s not even that easy to spot where those problems occur. Indeed, fragmented IP traffic (for UDP – not to be confused with TCP fragmentation) is considered bad because of the IPv6 fragment header. Best practice is to block it by default. If the DNS fallback to TCP is not working correctly, you will run into problems.
Some tips about the Palo:
– I’m always adding my recursive DNS resolvers to the “Source Address Exclusion” in the zone protection profile of that zone (Network -> Network Profiles -> Zone Protectiont -> select -> Reconnaissance Protection -> Source Address Exclusion) with all of its IPv6 and legacy IP addresses.
– Sometimes, certain detected threats kick in as well, hence I’m adding exceptions for the IP addresses of the DNS server as well, for example at the Vulnerability Protection -> select -> Exceptions tab.
– In some cases, you won’t get logs in the GUI for blocks of packet-based attacks. Have a look here: https://weberblog.net/pan-logging-of-packet-based-attack-protection-events-e-g-spoofed-ip/, that is: enable the “set system setting additional-threat-log on” on your Palo to get some more logs.
Thanks for the tips. But the reason seems to be something else. In my case, there is
– no zone protection
– no IPv6
– no Threat Prevention license (no Vulnerability Protection)
The licenses for my Lab PA-220 expired some time ago, and i’d like to rather buy a new PA-4xx withing the nex months.
I don’t know what the cause is. For now, i disabled DNSSEC as workaround.