This is a small example on how to configure policy routes (also known as policy-based forwarding or policy-based routing) on a Fortinet firewall, which is really simple at all. Only one single configuration page and you’re done. ;)

This is a small example on how to configure policy routes (also known as policy-based forwarding or policy-based routing) on a Fortinet firewall, which is really simple at all. Only one single configuration page and you’re done. ;)

If you want to use you own ownCloud installation, you can find several documentation on the Internet on how to set up this server, e.g. the official ownCloud documentation, or installation guides such as this or that or here. But none of these page alone provided enough information for installing a secure server completely from the beginning.
So here comes my step-by-step guide which surely won’t be complete, too. ;) However, hopefully it will help other people while searching for their way to install ownCloud. Additionally I am showing how to upgrade an ownCloud server.
Neben dem normalen Fotografieren und Filmen finde ich zwei Arten von Videos sehr interessant, nämlich Slow Motion Filme, bei denen eine schnelle Aktion sehr langsam dargestellt wird, sowie Zeitraffer, bei denen eine langsame Aktion sehr schnell dargestellt wird. Während man für Slow Motion Sequenzen leider teure Hardware braucht, die eine vielfache Frames per Second (fps) Rate als normale Kameras liefern können, kann man Zeitraffer relativ simpel selbst erstellen, in dem man eine Szene lang genug fotografiert und diese Fotos dann zu einem Video zusammenfügt.
Genau das mache ich seit einigen Jahren mit einer alten Canon Digitalkamera und einigen kostenlosen Softwares. Wie genau ich solche Low-Budget Zeitraffer in Full HD erstelle und was dabei zu beachten ist, erkläre ich in diesem Post sehr detailliert. Viel Spaß dabei. :)

Endlich ist es soweit: Ich lese den Stromverbrauch von unserer Wohnung mit einem Raspberry Pi aus und lasse mir von meinem Monitoring Server (MRTG + Routers2) schöne Graphen malen. Hierfür verwende ich einen Stromzähler mit einer S0-Schnittstelle, welchen ich direkt in der Unterverteilung eingebaut habe. Die Impulse des “Smart Meters” wertet eine Interruptroutine am Pi aus. Der Monitoring Server wiederum fragt den Pi per SNMP ab. Viele kleine Schritte also, die ich in diesem Blogpost ausführlich erläutern möchte. Viel Spaß damit!
Continue reading Stromzähler mit S0-Schnittstelle vom Raspberry Pi auswerten

This post shows a guideline for a basic installation of the open source syslog-ng daemon in order to store syslog messages from various devices in a separate file for each device.
I am using such an installation for my firewalls, routers, etc., to have an archive with all of its messages. Later on, I can grep through these logfiles and search for specific events. Of course it does not provide any built-in filter or correlation features – it is obviously not a SIEM. However, as a first step it’s better than nothing. ;)

This is a tutorial on how to configure the GlobalProtect Gateway on a Palo Alto firewall in order to connect to it from a Linux computer with vpnc.
Short version: Enable IPsec and X-Auth on the Gateway and define a Group Name and Group Password. With this two values (and the gateway address), add a new VPN profile within vpnc on the Linux machine. Login with the already existing credentials.
Long version with screenshots comes here:
Continue reading Palo Alto GlobalProtect for Linux with vpnc

In the legacy IPv4 world, the DHCP server allocates IPv4 addresses and thereby stores the MAC addresses of the clients. In the IPv6 world, if SLAAC (autoconfiguration) is used, no network or security device per se stores the binding between the MAC (layer 2) and the IPv6 (layer 3) addresses from the clients. That is, a subsequent analysis of network behaviour corresponding to concrete IPv6 addresses and their client machines is not possible anymore. The mapping of “identity to IP” is not done automatically somewhere.
A simple way to overcome this issue is to install a service that captures Duplicate Address Detection (DAD) messages from all clients on the subnet in order to store the bindings of MAC and IPv6 addresses. This can be done with a small Tcpdump script on a dedicated Ethernet interface of a Linux host.
In this blog post I will present a use case for storing these bindings, the concept of the DAD messages, a Tcpdump script for doing this job, and the disadvantages and alternatives of this method.
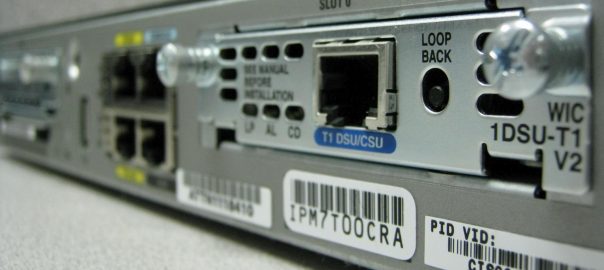
“We have two independent DSL connections to the Internet and want to share the bandwidth for our users.” This was the basic requirement for a load balancing solution at the customer’s site. After searching a while for dedicated load balancers and thinking about a Do-It-Yourself Linux router solution, I used an old Cisco router (type 2621, about 40,- € on eBay at the time of writing) with two default routes, each pointing to one of the ISP routers. That fits. ;)
Continue reading Basic ISP Load Balancing with a Cisco Router
Here comes an example on how to configure policy-based routing (PBR) on a Juniper ScreenOS firewall. The requirement at the customers site was to forward all http and https connections through a cheap but fast DSL Internet connection while the business relevant applications (mail, VoIP, ftp, …) should rely on the reliable ISP connection with static IPv4 addresses. I am showing the five relevant menus to configure PBR on the ScreenOS GUI.
[UPDATE] I later on wrote an article with policy-based routing with two different virtual routers. See it here.[/UPDATE]Continue reading Policy-Based Routing (PBR) on a Juniper ScreenOS Firewall

This is a small example of how to configure policy based forwarding (PBF) on a Palo Alto Networks firewall. The use case was to route all user generated http and https traffic through a cheap ADSL connection while all other business traffic is routed as normal through the better SDSL connection. Since I ran into two problems with this simple scenario, I am showing the solutions here.
[UPDATE] I also wrote an article about policy based forwarding with two different virtual routers on the Palo Alto firewall. See it here.[/UPDATE]Continue reading Policy Based Forwarding (PBF) on a Palo Alto Firewall

I am always interested in capturing real values via hardware devices in order to generate the appropriate graphs with my monitoring system. Of course, the outside temperature in our city was at the pole position for such a project. Therefore I ordered a few temperature/humidity sensors from PCsensor (via eBay), plugged them via USB on my Raspberry Pi (Raspbian Linux), and queried them via SNMP from my MRTG/Routers2 monitoring server. Here is the whole story:
Continue reading Measuring Temperatures with PCsensor’s TEMPerHUM Sensor
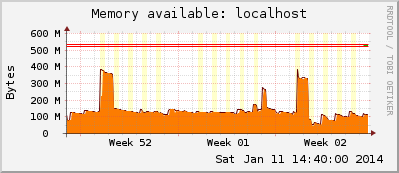
This post describes how to add a Linux machine to the MRTG/Routers2 monitoring server. First, the host must be able to process SNMP requests. Then, a *.cfg file for MRTG/Routers2 is created by running the “cfgmaker” tool with a host-template. Since a few values are wrong in the cfgmaker file, I also explain how to correct them. Finally, I am adding the mrtg-ping-probe lines to the configuration.
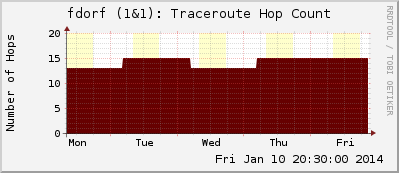
I was interested in generating graphs within the MRTG/Routers2 monitoring system that display the number of hops for an IP connection through the Internet. In my opinion its interesting to see the different routing run times/hop counts e.g. for remote offices that are connected via dynamic ISP connections such as DSL. Therefore, I wrote a small script that executes a traceroute command which can be called from MRTG.

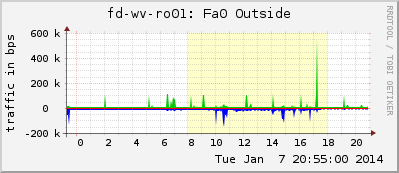
The Multi Router Traffic Grapher (MRTG) can, of course, not only monitor routers via SNMP, but any devices that support the Simple Network Management Protocol, e.g., switches. With the tool “cfgmaker” it is quite easy to add switches with many ports to the monitoring system. However, some subsequent work is needed to have a clean configuration. This blog post presents a step-by-step guide for adding a switch into MRTG/Routers2.
This post shortly explains the process of adding a Cisco router into the monitoring system “MRTG with Routers2” as I explained it here. It gives an example on how SNMP is activated on the router and how the *.cfg file for MRTG/Routers2 is created with the additional values for CPU and memory usage.